Sunday 30 June 2013

Delectable Red Velvet Cake

Today's recipe is one of my all time favs - Red Velvet Cake. And with this weekend being filled with Canada Day celebrations I deemed it absolutely apropos.

There are many versions of this recipe available, like anything these days, and I have done my share of searching around for the best one. But I am here to say that the recipe below turned out the best I have ever had or made. *The sole exception being Mrs. Vicki Lee, but I've chosen to exclude her in the comparison because I strongly believe it is not the recipe itself that makes the difference but the love that goes into it! Gosh I love me some Southern bakin'...

Back to the cake. I originally found this recipe over at Divas Can Cook blog. When Monique claimed it was the BEST red velvet recipe ever I had to take a closer look. And when I caught sight of the last ingredient I knew, even before it was out of the oven, that it would be my go-to forever more. I was absolutely right.


Ingredients:
  • 2 cups All Purpose Flour
  • 1 tsp Baking Soda
  • 1 tsp Baking Powder
  • 1 tsp Salt
  • 2 tbsp Cocoa Powder
  • 2 cups Sugar
  • 1 cup Vegetable Oil
  • 2 Eggs
  • 1 cup Buttermilk
  • 2 tsp Vanilla Extract
  • Red Food Colouring {1-2 oz + Depending on how bright you want it}
  • 1 tsp White Vinegar
  • 1/2 cup Prepared Plain Hot Coffee {Key to Success - Don't skip this Ingredient}
Now let's get baking:
  1. Preheat oven to 325°
  2. In medium sized bowl whisk together flour, baking soda, baking powder, cocoa powder and salt. Set aside.
  3. In large bowl combine sugar and vegetable oil.
  4. Mix in eggs, buttermilk, vanilla and food colouring.
  5. Stir in the coffee and vinegar.
  6. Gradually add the dry ingredients in with the wet ingredients. 
  7. Grease and lightly flour two round cake pans.
  8. Pour batter evenly between each.
  9. Bake for 30-40 minutes on centre rack. *Do not over bake. It will continue to cook as it cools.
  10. Let stand for several minutes before removing from pans. *Loosen the cake from the pan with a knife before trying to remove. Allow to cool completely.
  11. Once cool, trim the cakes straight across the top for level stacking.
  12. Ice the top of the first layer. 
  13. Once smooth add the second layer and ice top and edges.
*I used Cream Cheese Frosting. The same as for my Carrot Cake.

And there you have it - delectable in cake form! Just in time for the red and white festivities {blue could certainly be incorporated}!

What other goodies are gracing your tables this weekend? Dish! Or if you are stumped, scoot over to Divas Can Cook for more great recipes.

Chat soon.


Friday 28 June 2013

Cleaning Out the Closets...

I have entered organization mode! A lovely change from my late project driven self. But who is to say where this new direction may lead - perhaps right back to where we started. But in the mean time, I can guarantee we are headed into a storm before any forecast of calm. 

A few weeks back I shared inspirational, delightfully organized and eye catching closet spaces {which you can catch up on here} just because. Who doesn't love to admire someone else's tidy handy work? So this a.m. when I woke motivated to pull a messy space, or two, into shape my mind automatically turned to the closets. 

Finley's is the first on the list, and has been for some time, because he is growing like a weed and I am behind on switching out his clothes.

This is what we are working with {today}:


It could be better, but it could certainly be worse. The space is tidy but not overly functional. The basic one shelf with hang-bar just doesn't do the trick. So we will see what we can do about that. But in the mean time, there is lots to be done.


*This is a previous approach to the closet. That dresser fits like a glove in there. But it is too pretty to tuck away out of site so it is currently out for all to see.


I purchased these AWESOME extra large rubber.ish. bins from the fan-stinkin-tastic Supertore. And can I just say, I am over the moon in love with their stuff! I honestly have to stop getting my groceries there or Robert will be divorcing me before the thought of marriage even enters his mind.

Now back to the bins. These are lightweight and the handles are sturdy. The size is perfect for what I have in mind, organizing the stock pile of clothes I have for our kid, but would also be ideal for toy storage or craft supplies. And they come in several vibrant colours as well. Now for the best part - they are regular $12 each {there is a smaller size that costs a bit less} but I got them for 40%! Officially tickled pink!

Can you tell I am excited about this venture? Honestly, I should be getting a cut for promoting the Superstore! Better yet, free stuff! Oh how I like the thought of that...


And this reality brings my reverie into check. This is the spare room closet {high on the organization list of to-do's}. Blah! It is the home to the totes worth of kids clothes I alluded to above. My brother kindly passed on his children's outgrown clothing and over seven  years I now have quite the stock pile.

Some of them are girl clothes which may have to be passed on from our household without having gotten any use. But either way, something has to be done to get these bins out of this prime real-estate in my home.


 Though in my defence, they are already organized and labelled by gender and size.


So that is as far as I have made it thus far.

  1. I'm motivated.
  2. The closet is emptied.
  3. Clothes are being sorted: Too small = out. Next size up = in.


I recommend doing the sorting part of this process while the kiddos are away. Or that storm may enter a danger zone. But sometimes you just have to do what you have to do.

I'll keep you posted on our progress. Why don't you tell me what you have been up to as far as organization? Any suggestions for the closet from those of you who have gone through this process before or known of someone else who has?

Chat soon.

Thursday 27 June 2013

Birthday Celebration Details

I know. I know... I owe you an apology for having been MIA over the past week. Guilty. It has been noted and I will put my bestest effort forth from here on out not to leave you out of the loop for so long again. 

My excuse? There is just not enough time in the day! 

You must be thinking I am not the sharpest tool in the shed if that is my great revelation of the month. But hear me out. Im not as dense as that statement may make me seem. 

From time to time I tend to enter a Superwoman mode. Tell me you have never done the same! The daily to-do list gets out of control. Add your social commitments, errands, and cleaning. Then tack on exhaustion {common-law had been gone for over two weeks}. And you are left with literally nothing left to give. Instead of throwing in the towel you truck on. But Superwoman is fading, soon to be no more. That was me. Is me.

Which is why I took a little sabbatical. Some down time to myself. And let me tell you, it comes highly recommended. Even if it is just a few minutes to yourself each day - reading a magazine, taking the time to shave your legs in the shower, or ducking out to weed the garden. Whatever it is the relaxes you. I assure you even the shortest of time will be rejuvenating. Exactly what I needed in order to pull myself and Finley's first birthday celebration together.

We didn't go overboard. He is only one of course. But I did make the effort to add a few special touches to make the day memorable - even if it is just via photograph for the birthday boy.


Our door has gone unadorned all season long. Sad but true. But for this special event we wanted to make our guests feel welcome. We did so by creating a simple DIY clothesline 'welcome' sign.


Seven burlap triangles, twine, clothespins, and hand cut letters were all it took to enhance the door and give it a cheerful hello.


To keep a constant theme throughout, we made the 'Happy Birthday' sign in the same style. But in loo of the burlap we went with colourful flag style paper. It was hung above the sliding glass door leading out to the deck because that was the highest traffic area.


As far as drinks go, we did a simple grab and go style. An ice filled tub held pop, juice packs, and ice smoothies - labelled for their intended audience.


The table decor was minimal. A white table cloth set the stage. And three 12x12 fabric squares, left over from previous projects, were used to add a pop of colour with a masculine edge.


White and brown trays and bowls were used so they blended in to the table and let the food speak for itself. *The first course of snacks were scooped up before I thought to snap a photo to share with you.

And to avoid a major clean up at the end of the day, we picked up inexpensive paper plates and cups to go with the colour scheme. 


To keep things simple BBQ was on the menu - chicken kabobs, hamburgers, hotdogs, and sausages. As sides there were two salad options, fruit and veggie trays, a delicious seafood dip {tis the season}, chips, and homemade guacamole {find that recipe here}. For desert there was an option of carrot cake or strawberry shortcakes.


There were three young boys with birthdays close together, so we put all three on the carrot cake. Finley's cousin Jevon, on the left, has the very same birthday as him! And our neighbour Rowan is just a few days after. They were delighted to be included.


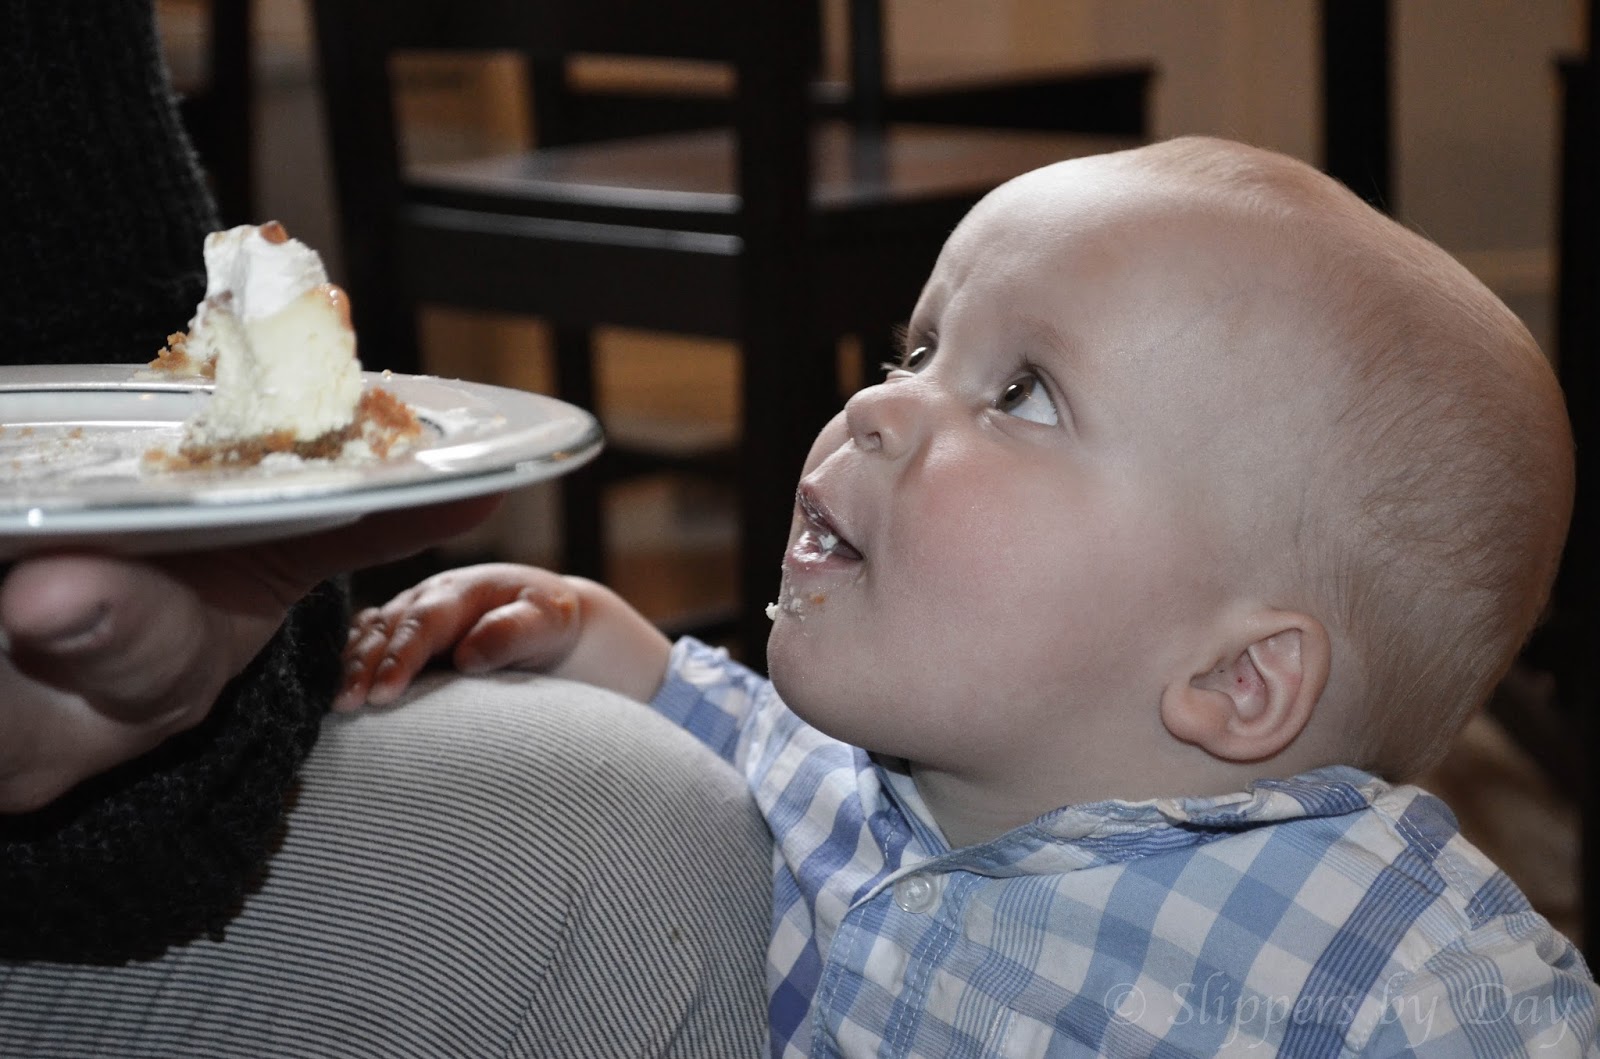
But not to be out shined on his day of celebration, Finley had his own little cake all to himself. I took the easy route by decorating with a dinkie car - his favourite toy.


He wasn't sure at first what he should do with a treat that size...


...but it didn't take him long to figure it out! He was one happy guy.


Of course the boy was spoiled. And all our friends and family got him sweet gifts that will be used and loved. But a highlight was the crab sandbox that my brother Josh and his family gave. They were the first guests to arrive so everyone got to play and enjoy it for the duration of the party. Trips through the sprinkler and kiddie pool were perfect after a play in the sand!


 Finley didn't quite understand the concept of washing off... But he was happy as a clam none the less!


And when it was all said and done - everyone was pooped, kids and parents alike - treat bags of candy, toys, and stickers were sent home with each young guest. Simple tags helped identify who's was who's because the contents varied based on age and gender {The girls got skip ropes, candy necklaces, and princess stickers for example. And the big boys got big league chew and nerds. While the wee baby got a sand toy.} And Finley signed each personally the only way he knows how - a paint dipped hand print!


Though the rain didn't hold off long enough for us to enjoy the planned bomb fire and smores, the day was just perfect. A mix of water, sand, laughter, and good food is always a recipe for success!

And what about you? Any up and coming summer events you have planned? What special details will you be incorporating? Dish!

Chat soon.

Wednesday 26 June 2013

Get Inspired

I'm desperately in need of inspiration this week. How about you?

There are those times that I discover inspiration in the simplest of places. It seems to be here, there, and everywhere. This week I can't help whistling a completely different tune. I'm stumped. Which leads to lack of motivation. Which in turn leads to zero productivity. Which is a total bum.mer! Especially since common-law is home and readily available for handy work.

Has anyone else caught a ride on the same lazy train that I seem to be stuck on? If so, here's to hoping these gorgeous house tours, from some of my favourite bloggers, will be just the ticket to Productivityville.

Source

I think I have died and gone to cabinet heaven! This crisp white kitchen is my idea of perfection. And with simple pops of colour - I am quite honestly coveting those blue stools - Hollie has most certainly got an inspirational room on her hands. Coffee date at her place?

Source

I adore Aimee's style, over at It's Overflowing. Her entire home is lovely. But I especially love the transformation of her living room! The painted brick fireplace in contrast with that area rug that I would literally throw down for. The bright airy feeling it exudes. And the unexpected pops of colour and pattern. 

Source

This office space that Ashli over at the Mini Manor Blog has put together is quite honestly one of my favourite rooms I have seen to date. *And I love nothing more than a home tour so I have seen quite a few in my time. The bright airy feel. Colourful books and art. The his and hers desks. That rug! And the clever book ends... Each detail helps pull the space together to create a welcoming working environment.  Add a comfy reading nook and I wouldn't be able to leave! {If you haven't already, do take her house tour. It alone will get you up from your computer and working away at that honey-do list.}

Source

Jennifer, the voice and talent over at Rambling Renovators, is my kind of gal! She believes the magic of home decor 'lies in the details' and based on the beauty of this room, and the rest of her home, her powers run deep. Each detail enhances the room and pulls it together to create a work of art. *Those mounted reading lights are darling. And the panelled wall! Oh, Robert...

Source

Welcome! Step right in. Doesn't this simple yet oh.so. functional entryway make you swoon? Or at least want to kick your shoes off and stay awhile? Maybe that is just me. But I dare venture to say Sarah, designer and mastermind behind this space, would whole heartedly agree. Her clever organization, functional storage, and pops of pretty make this small entry a dynamic and coveted room in her home. *Follow her and all her creative DIY adventures at Sarah M. Dorsey Designs
Source

Last, but certainly not least, on todays inspirational tour is Ashley and Jamin's back yard bungalow from The Handmade Home. Their entire home is beautiful and filled with thoughtful items that pull each space together to feel intensional, logical, yet perfectly lovely. And this quaint backyard play zone is no exception. I can not imagine any child, or adult, not falling in love with this darling backyard home.

Did that do the trick? Are you feeling energized? Roaring to go? Do! *Then come back and tell what you got up to!

Chat soon.

Friday 21 June 2013

It Doesn't Have to be New

...well not always anyhow.

There are always those times when it is nice to splurge on a shiny new trinket, or two. When a room in your home, or a staple item in your closet, needs that one thing to take it the next level and it can not be found second hand. That day is approaching the MacDonald/Gaudett household. But today is not that day.

I have acquired a few new items that I am oh.so excited about. What I am going to do with them all? That remains to be seen. But I just couldn't pass them up. You'll see why.

Vintage Highchair

This vintage highchair once belonged to my grandfather on my mothers side.
Cost: Free

Vintage Piggy Bank

Literally, a piggy bank. I am planning to incorporate this treasure into Finley's eclectic room.
Cost: Free 

Old School Desk

I have plans in mind for this old school desk. With a little love this could be a great craft and work area for Finley down the road. Or for the cousins when they com to visit in the mean time.
Cost: Free

Old Barrel

This barrel is worn, just the way I like it. After a little fix-er-up I hope to use this outside for a planter of sorts. We shall see.
Cost: Free

Old Child Size Desk Chair 

A simple coat of paint will bring this chair to life. 
Cost: Free


Detailed Mirror

Isn't she a beauty? I cant wait to find a spot for this wood framed mirror. The glass may need to be replaced but you cant beat the price.
Cost: Free

 'M' is for MacDonald

My Mother-Dearest has had this, along with several other letters, tucked away in the Spa Room for years now. I kindly suggested I could take it off her hands. What I will do with it? Time will tell. But I have a feeling it will be a goodie.
Cost: Free

Small Finds

Here is the smaller loot: Orange Vase, Bathroom Art & Frame, 2 crochets throws, Enamel bucket with handle, Enamel wash tub, and Enamel decorative item.
I know it doesn't look like much now, but with a little love each of these goodies will eventually be put to use in style. You'll just have to keep checking back as to the how and where.
Cost: Free, Free, & Free

Too Cute to Leave Fish

This has been my splurge as of late. It was oh.too.cute. Don't you just want to give it a smooch?
Cost: $8.45 {on sale from $20} @ Weaton's

That is it for the haul as of late. Ill keep you posted when I have another little stockpile. 

*Most of the free.b's came from my cousin Steph. She was getting rid of her excess. One persons junk can become a treasure - after a little TLC.

What about you? Have you found any new treasures? Something cheep cheep? Or perhaps a splurge? Spill the details.

Chat soon.


Thursday 20 June 2013

Photo Tale

A photo says a thousand words.

Well, here is my official novel recording our trip to visit Gram and help her launch her retirement years with style. And by style I most certainly mean smiles, smirks, snacks, and sand!


Moments to be cherished.

The End.


Related Posts Plugin for WordPress, Blogger...
BLOG DESIGN BY DESIGNER BLOGS