Showing posts with label Entryway. Show all posts

Friday, 7 June 2013

Summer House Tour

Raise your hand if your home is well lived in!

I see those hands! Wow...that looks like most of you. And Im right there next to you in the crowd. Yeah thats me. The one in the filthy slippers. I forgot to switch them on my way out the door. C'est la vie!

This house of mine is not quite two years old and yet if the walls could speak I would be frightened of the tales. The combination of turbo dog, kids running and crawling a muck, and a bossy do-it-yourselfer results in a go-ahead, come-back type of situation. As soon as one project is done three more are added to the list. Then a jar of coffee gets dropped and cracks a tile. Tack that one on as well.

It quite literally will never end. Which is why I have decided to take this time and embrace the few spaces in my home that are on their way to decorating success. Do, however, keep in mind they all have a ways to go yet.

Main Entryway

Living Room

Dining Room

Kitchen

Pantry

Laundry Room

Main Floor Bath

Finley's Room

I hope you enjoyed the tour! And if you ever want to do it again, and again, it will be easily located at the Our Home tab. *Do check back for updates! I for one love walking through my house online. It is much cleaner than the real thing. A lot less dog hair!

And if you are a regular around these parts you may have noticed a few changes we have made. Check back this week when I share those successful DIY projects.

Looking forward to a chat real soon.


Im sharing this at

The Shabby Creek Cottage Link Party

Tuesday, 7 May 2013

Mirror Mirror

...on the wall, who is the fairest of them all?

Why our entry space of course!

Alright. That is a quite a stretch if I am being honest. Our entry has come a long way as far as function since we started. Ill give it that. But visually, it is still lacking major appeal. It needs...something. I just cant seem to find the items that will add the flair I am going for. But in the mean time I will settle for serviceable.

Recall, one more time, where we started and how far we have come...


*If you want to catch up on the steps along the way do check out any {or all} of these posts: Hodgepodge Friday, Pinch of Productivity, Buckets of Fun, Sunday Reminisce, What Not To Do, To Do, Labelling Toward a Better Tomorrow, A-Z Entry Closet.

And now for our latest addition. Small but mighty - in the welcoming department. 

I finally got around to bossing Robert into hanging that mirror I found a while back {and mentioned here}. And it actually winded up fitting like a glove. {There's Ace Ventura again...}

Welcome, Welcome
I read Storage & Display put out by Pottery Barn a while back and its section on entry spaces has really stuck with me. It pointed out the fact that your entry says oodles about your home and sets the stage for what is ahead {Clearly not a verbatim quote. Pottery Barn would never say oodles}. It went on to say a plethora of valuable things and I would highly recommend picking up a copy. But what I took away by memory where the key components that create a welcoming entryway that offers 'traditional comforts of hospitality':
  • A place for guests to sit and remove footwear {check - trunk with comfy/headache cushion and practical storage}
  • A surface to drop anything a guest or you may be carrying {Working on it...But at least the keys and odds and ends have their spot in the closet buckets}
  • A mirror to sneak a peak {!!! Enter giggle of delight here.}
  • An umbrella stand/hook {I am on the hunt - for a stand along with a classic umbrella or two}
  • Somewhere to hang your coat {Check!}
There is a lot more to be considered in an entryway than immediately meets the eye. If you ask Pottery Barn - but I would tend to agree. Just by adding a simple mirror my entryway went from a drab place where you kick off your shoes to a room that at least whispers 'welcome.' 


Hopefully with a few more treasure finds along the way that whisper will become a straight up, 'Come on in and stay a while!'

Chat soon! 

Tuesday, 23 April 2013

A-Z Entry Closet

It is a happy happy day here at the MacDonald/Gaudett household! Not only is it Roberts arrival day, which we are up and over the moon about, buuuttt it is also entry closet reveal day!

Booya Grandma! Woot Woot! Bow-chicka-wow-wow! What What!!

Alright...maybe I am getting a little carried away here. But truthfully, the only thing that makes me more excited than a well organized, highly functional space is the arrival home of my opposite-sex common-law partner! And they are both happening on the very same day so I am officially loosing it over here. {Finley and Moe are too but they just cant seem to express it in as many words!}

But I digress... Back to the closet. Shall we recall the original state we founded it in {Introduced here}.


Blah! This closet was just not doing the trick - which is clear as day in these photos. It is a small space to begin with and having every bin and basket overflowing did not help matters. 

But today that same space is whistling a different tune. 


Much easier on the eyes. Don't you think? And honestly, I am lov-ing how user friendly it is for the whole family. 

Care for a closer looksey?


First things first, we added this second shelf for easy rotation of seasonal items. I've always been a firm believer that closet space is prime real-estate in a home, so why not maximize it?!


And continuing with that train of thought, we added basic hooks to this narrow wasted space for additional storage. I picked up three buckets at the local Dollarstore to separate those everyday, quick in and out, items. 

1. Mail, Keys, Sunglasses, iPods, & Chargers
2. Bitty Shoes
3. On the Go: Umbrella, Sunscreen, Chalk, Puppy Poop Bags, etc.
Finn and I are loving these buckets - but for different reasons. I find it so handy to have everything in one spot. This avoids dealing with misplaced items and helps lessen the likelihood of forgetting anything when rushing out the door. Finn on the other hand enjoys his new game of emptying his shoes onto the floor. {Little does he know, soon he will be asked to go fetch his own shoes because they are within reach.}


*Keep in mind, when hanging your hooks, that your family is ever evolving. You want your design choices to change and grow with you. For that reason, we opted to make the top hook a tad farther apart than the bottom two. This will allow me to change up what I place here in the future - yoga mat, backpack, Finley's coat when he is a bit taller, etc. Planning ahead will make all the difference in how you are able to use your space.


*Already I have switched up the order of the bins to have the Mail & Keys in the centre for easier access.


As far as the shelving goes, we switched out those oh-so-small plastic bins for these larger-than-life collapsible ones {marketed as magazine holders}. Nothing will be overflowing out of these bad boys! And with the homemade tags we whipped up, everything will easily find its way home. This space is fool-proof! {Which honestly - who are we kidding - is exactly what this household needs!}

Another angle of these beauts for ya!
We have gone from the top of our heads, now down to the shoes on our feet. Which I personally always struggle with in an entry space. I don't love those flimsy shoe racks you can buy and am not willing to commit to cleaning low built ins at this point in my life, so am left twiddling my thumbs {or toes if you will.} I have in the past resorted to a huge bin or basket but can never seem to find my shoes mate in a hurry and end up scampering outside in my slippers. So this time we are giving a few smaller baskets a whirl {along with the seasonal/less active footwear stored in the trunk - pictured here}.


Shoes do not make for the most appealing photo - my apologies. But you get the idea. I am findingthat the two separate baskets for different styles of footwear really seem to do the trick. You can quickly locate and grab the pair you want and just replace them to the front when you are done. Easy-peasy lemon squeezy!

And if you are wondering what is hidden in that smaller basket with the lid...


Surprise! Shoe cleaning supplies! {And Finn's inflatable pool for the summer - which I don't want to forget we have.}  I have honestly had these guys in every logical spot I can think of around here - the cleaning supplies closet, our master closet where most of our leather shoes reside - but they just never get used because they are a hike and a half away. They really need to be readily accessible if they are going to get used. Heres to hoping!

Put that all together and what have you got? Bippity, Boppit, Boo...


...a fresh, well organized space that can basically maintain itself.

Can I get a, 'Booya Grandma! Woot Woot! Bow-chicka-wow-wow! What What!!'

*Ill keep you posted on just how 'fool proof' it really is!

Chat soon!

Wednesday, 17 April 2013

What Not To Do, To Do

This Momma is tired.

I have put dish soap in the sink and 'filled' it without putting the stopper in. Paid Roberts balance owing for his income tax to my SIN {still trying to fix that one up}. Absentmindedly forgot Moe's water dish on the floor countless times, only to find Finn covered in water from head to toe. Had the genius idea to pick up Moe poops during a wind storm and as the wind blew the pick up bag I grabbed poop after poop in my bare hand {Fool me once, shame on you. Fool me twice, poop on me} And best of all, changed Finns bum and fully redressed before realizing he wasn't wearing a diaper. *I seem to be having a 'poopy' week.

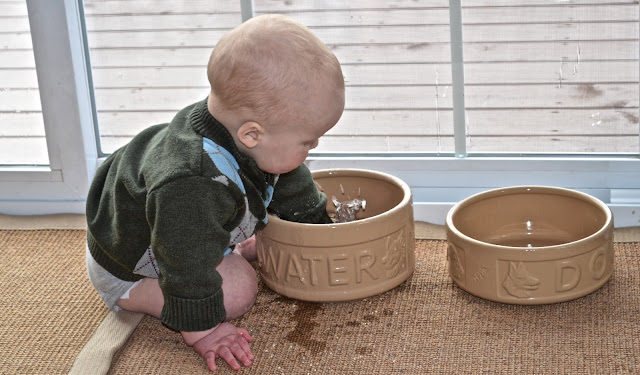
One instance of the water bowl.
{Being photographed because after the 5th wardrobe change I found my sense of humour}
Poor guy is in desperate need of a friend when his role model is the family pet...
{And honestly, Moe is the messiest dog to ever take a drink} 
I cant begin to imagine why these things keep happening...

Perhaps it has something to do with the fact that I have not had a full nights sleep in over a year {almost 10 month old babe + at least 3 months of regular nightly trips to the toilet = that not so glamorous truth}, am scatterbrained to begin with, and have been staying up late scurrying around the house with light pitter patter productive feet.

Please note that I am in no way complaining - just merely sharing my scary mental state. I thought it would be selfish {not sealfish spellcheck!} to keep my embarrassing moments a secret. Why not brighten your day?

So, at the expense of my mental clarity, allow me to introduce one of my late night ventures.


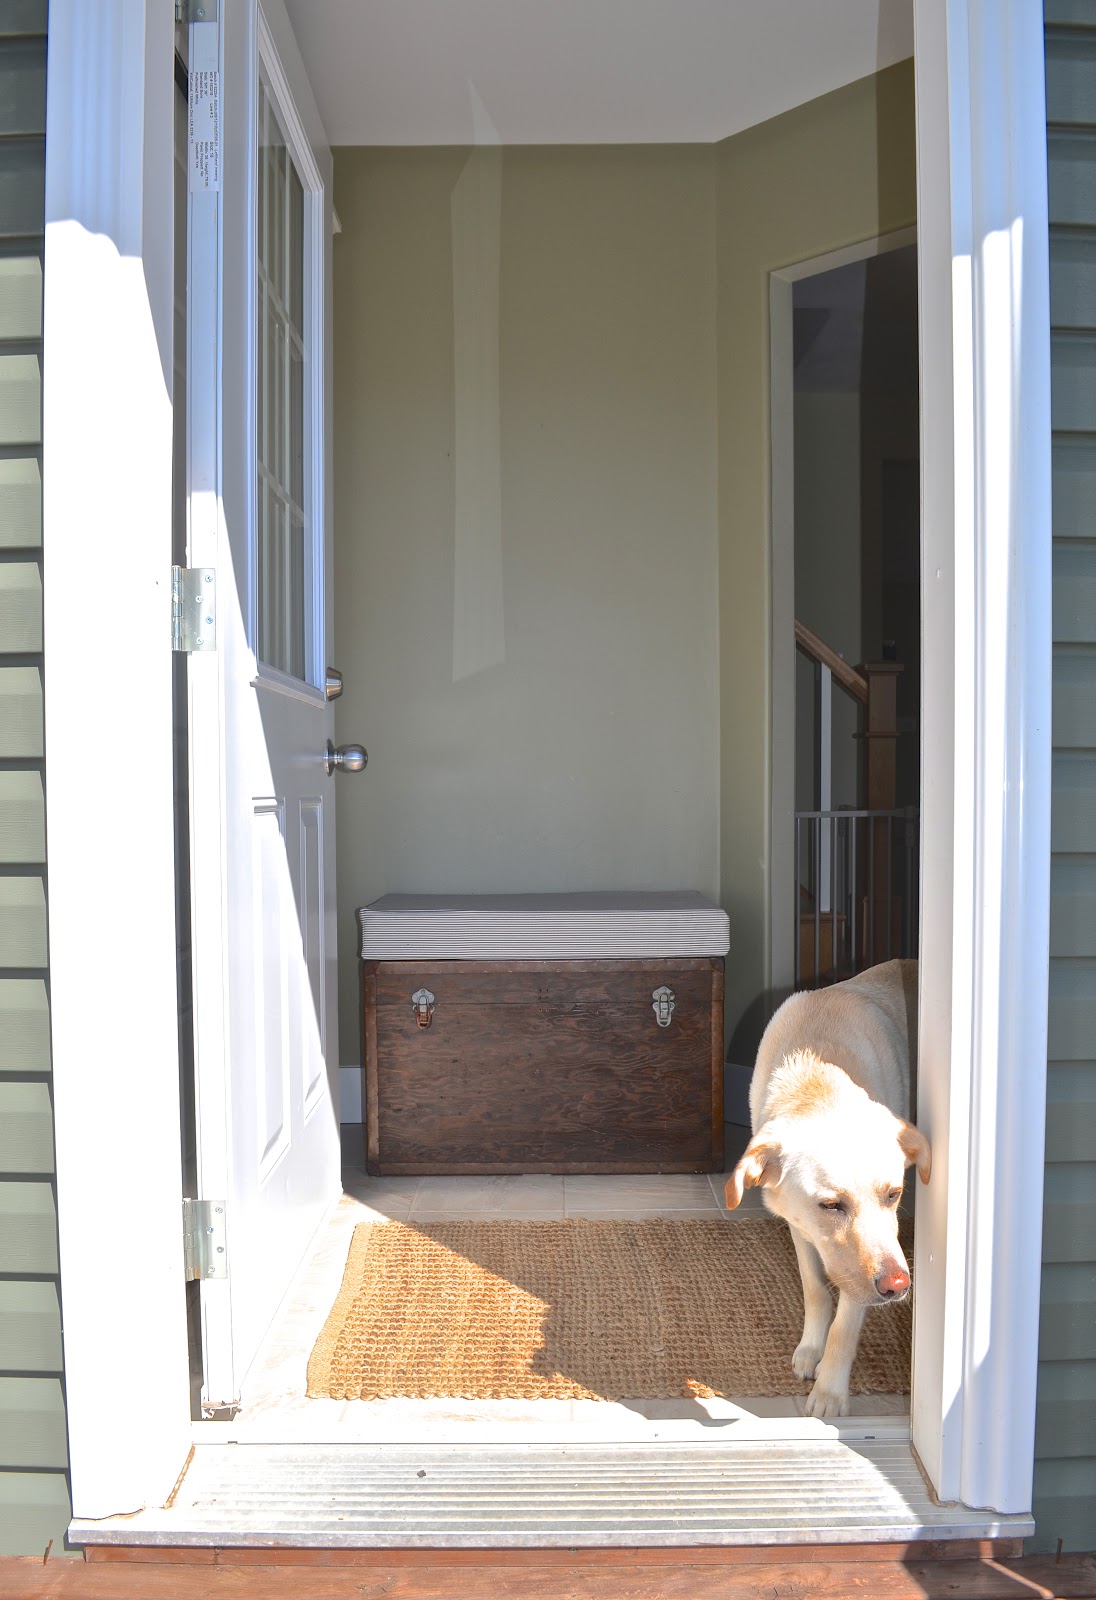
Impressed? *Make sure we are all looking at the same thing here. It is the {somewhat} successful slip covered cushion sitting on the vintage trunk that we are all ogling - NOT the trunk itself. I know I am impressive {not to mention humble} but give me a break - I cant remember to pick up a dog dish these days!

I am proud of myself...that I made it through to the end of this project without throwing it in the trash or lighting a fire in the yard just to burn it! And I am not being extreme in the least. Let me tell you...

I just had it in my mind that the trunk needed to morph from functional storage in a small space to all that AND welcoming bench. I didn't stop to think. {'How does one make a slip cover?' or 'Sewing is not your forte Allison!' would have been appropriate thoughts along the way. But no.} I just hauled my fam to the fabric store and forced common-law to have input when I was going to pick what I liked anyways {recall the sneak peak}. Came home determined to sew a slip cover - zipper and all. A first for both.

'Not the sharpest tool in the shed.' There - I said it for you.

I got set to work... {Warning: Do not use this as reliable instruction. I had to wing it by the end.}


Gathered all necessary supplies.

  • Sewing Machine and Gear
  • Foam
  • Cutting Surface
  • Fabric Cutter
  • Pins
  • Fabric And Zipper
  • Measuring Tape
  • Right Angle Tool {??}
  • Sharp Knife
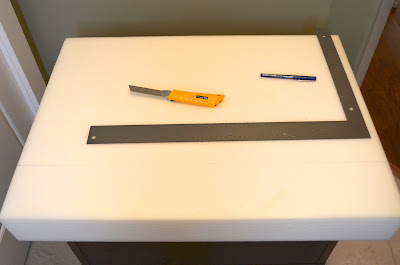
There is the 'Right Angle Tool' listed above.
Cut the foam to size. *If you cant purchase it pre cut to the size needed.

Then I cut all the fabric pieces I needed all at once {6 in total}. Because I was working with a stripe, I wanted to ensure no slip ups later on with directionality. Keeping in mind that I wanted the slip cover to fit nice and snug I cut a quarter of an inch less than the foam itself {plus the seam allowance}.


I then sewed three of the four 17' pieces together {top, front, and bottom}.


Now for the zipper. After a minor freakout {because I didn't have the first clue about sewing a zipper}, I pulled myself together and turned to google. I found this fantastic blog, Make it & Love it, and a step by step post she had done about installing zippers. Few. My sanity saved.

I followed her direction. Cut the fourth side in half, sewed the two pieces together, then ironed the seam down flat. {Check out the her blog post to get a detailed play by play}


I then taped the zipper face down on the ironed pleat.


 Placing a pin at the bottom of the zipper, I set to work sewing.


After a few tears, sips of coffee, and phone calls to Robert I had success!! Booya!


The zipper piece was then added to the other block to finish it off. 

Enter problem. I have four of the six pieces I had cut sewn together but have no way of adding the end pieces without creating a mother of all messes. Reason? Because when sewing a cushion cover you only need 4 fabric pieces: top, bottom, one middle band, and the zipper piece {For reliable direction I, after the fact, recommend this post from Honey Bear Lane.  


In my state of frenzy, and embarrassment, I stopped photographing until I managed to get one end on and not have it look like a demented monster. 


And Ta - Da! I made it through! Bazinga!

Though my ego has taken a beating I am proud of myself for pulling through and turning out a decent product - on the outside {no one will EVER see the inside of that slip cover. EVER.} I hope we have all learned from my mistake. Slow down. Take the time to actually figure out what the heck you are setting out to do. And in my case, remind myself that, 'Sewing is not your forte Allison!'

Needless to say, I don't foresee another sewing project in my immediate future.

But since we made it this far, lets at least look at the difference it makes.


The before and after are enough to justify the efforts. Do you agree? The cushion says, 'Welcome to our humble abode. Sit, rest, allow me to lighten your load.' Does it not? {And just wait until we get that wall decorated with some pretties. It will be screaming those words!} *Moe insisted on being a part of the shoot! He is frustrated that he isn't getting enough face time.


And finally, a peak inside the infamous trunk! Such a useful space to store seasonal and occasional footwear! I love that they are tucked out of site yet not so far away that it is a major effort to fetch them when needed.

Hoping your mind is in a better place than mine on this Wednesday afternoon and that you at least got a little giggle {or deep belly laugh} at my expense.

Chat soon!

Friday, 5 April 2013

Hodgepodge Friday

Alas, my planning session did not go exactly as originally intended. Does anything?

The good news, however, is that the original plan {which I set out here} was in fact a decent one and is going to work fantastic for us - eventually. The process of getting everything down and organized is just going to take a tad longer than I had originally anticipated. And truthfully, I am just not as patient as I seem in writing! {Enter giggle here - hehe} Therefore, since I have Common-Law around for a few more days I thought I'd put him to work and tackle a few simple projects while I work away at organizing my sporadic thoughts and plans.

So what I can offer you on this bright Friday afternoon is a glimpse into the hectic hodgepodge that is our home. {Honestly, who am I kidding? Our home can be summed up as a hectic hodgepodge on a daily basis! And it's Friday, so it's ok! Right?}

My 'Medium Black Book' of lists & lists & more lists
Simple Approach: Black-Space, Blue- To Do, Red-To Buy 
Tabs make it quick and easy to add a task to any list when it comes to mind.
I'll share my 'Front Entry' list with you today because that is where I have put Robert to work already. {Too predictable?} But as I complete each list I will add it with a 'before/as is' shot so you have an idea of what we have to work with.

Front Entry
  • Organize Seasonal Items {Rotate Out}
  • Touch Up Paint Left of Door
  • Clean and Seal Grout
  • Wipe Down Walls
  • Touch Up Baseboards and Closet Shelf Front
  • Change Sliding Door 'Knobs'
  • Build Second/Higher Shelf in Closet
  • New {Bigger} Bins/Baskets & Organize
  • Bins for Second Shelf {w/ Lids}
  • DIY Trunk Cushion {Supplies}
  • Make Label Tags for Baskets/Bins
  • Hang Hooks on Left Side of Closet
  • Colourful Mat {Measure}
  • Make Pillow Covers for Seating {w/ Leftover Fabric}
  • Main Wall Decor {Art? Mirror?}
  • Develop a Place for Mail, Keys, Etc.
  • Make/Buy Welcome Sign/Wreath 
  • Shoe Mats for Closet
  • Umbrellas
  • Screen Door
  • Paint Front Door/Screen {Supplies}

Phew! That is it - for now.

*I have written down literally everything that I would ideally like to accomplish in this space {and will do the same for every other space in our home}. The reality is that it will take years to accomplish everything; if we even stay in this home long enough to make it through all of them. But the lists are intended to be goals with dreams incorporated. Why not dream a little {or a lot} along the way? What could it hurt aside from our budget?

And a peak at whats first up on the agenda...

Before

We hauled everything out!

And now Robert is working on one of  those items from my list!
Naturally, I am tickled pink with our productivity. I hope you are inspired to get to work on something this weekend too! 

* I just had to share that Robert and I got out on a hot date to the movies this week and saw Olympus Has Fallen with Gerard Butler {whom I love love} and it was fantastic if you are into action films! Four thumbs up!

Date Night Cheeses!

Happy Friday!


Related Posts Plugin for WordPress, Blogger...
BLOG DESIGN BY DESIGNER BLOGS